
|
C-7 Home Page
Questar Distribution
Questar Telescopes |
|||||||||

|

QUESTAR 45 DEGREE INCLINED IMAGE ERECTING AMICI PRISM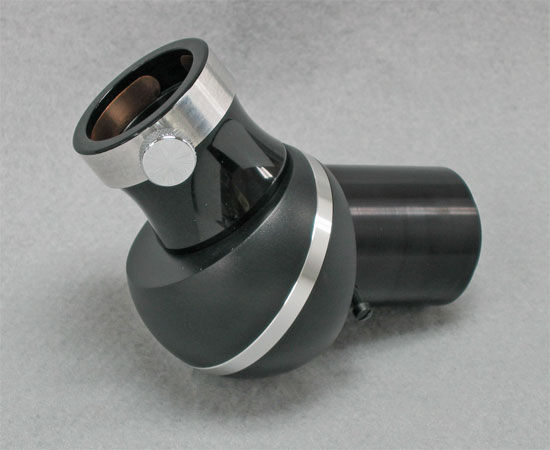 The Questar 3-1/2 telescopes have been regarded as the finest compact telescopes of their class since they were introduced in 1954. These telescopes incorporate a Control Box with a Visual Port at the top rear of the telescope which accommodates an eyepiece, usually a Questar Brandon but third party eyepieces may be accommodated too.
Right: Questar Image Erecting Prism eyepiece port showing thumbscrew to secure eyepieces (22,086 bytes). From their introduction until the 1960's Questar telescopes incorporated an image erecting prim within their Control Box. But no matter how well made these prisms were, the limitations of glass technology compromised image quality somewhat. When observing at low to moderate magnifications the image quality was acceptable. However, the more discriminating observers pushing the telescope to beyond 200x for observing planets, etc. cringed at this and so in time Questar changed from the original internal image erecting prism to a better quality 90 degree prism. In this arrangement the telescope provides an image that is crystal clear and the image is erect appearing to stand up properly. But the image is reversed left to right and so a person in the distance waving with their right hand appears to be waving with their left. This is perfectly normal with many telescopes that seek to provide the best quality of view with the fewest compromises. Most people who use the Questar become used to the left to right flip so that as a target appears to walk left in the eyepiece, the observer will follow it by panning the telescope to the right. But some people prefer the image erect view for reading wildlife tags, for surveillance, or simply for convenience, and these are for whom we make the Image Erecting Prism. The Questar 3-1/2 telescopes incorporate a Control Box providing the observer with the choice of three magnifications per eyepiece (Finder, Low and High Power). The Control Box employs two control levers, one of these employs the built in Barlow high magnifications lens. The other control dials in a 90 degree Prism (also within the Control Box) to divert the incoming light beam from the telescope main optical tube 90 degrees up to the eyepiece. With this Prism in line the Axial Port is blocked. With the Prism moved out of the way by rotating the Control dial clockwise by 45 degrees then the Axial Port has clear access to the telescope for another eyepiece, an Image Erecting Prism, or Camera Adapter. With the Prism moved away the Eyepiece port also has clear access to the Finder. So, one can be imaging through the Axial Port while simultaneously looking at the target through the Finder waiting for the object to be positioned just right prior to snapping the photo. This is a 1.25 inch diameter fitting and so it can be used with conventional telescopes, with conventional third party slip fit eyepieces. To permit its use on the Questar Axial Port the Image Erecting Prism requires the optional Slip Fit Low Profile Adapter (PN 19431-03A). The Questar Brandon eyepieces slip into this adapter and are secured by a recessed brass ring under the thumbscrew location, so as you tighten the thumbscrew the brass ring clamps onto your eyepiece. This provides a secure grip and will not mar the barrel of your eyepiece. |
||||||||
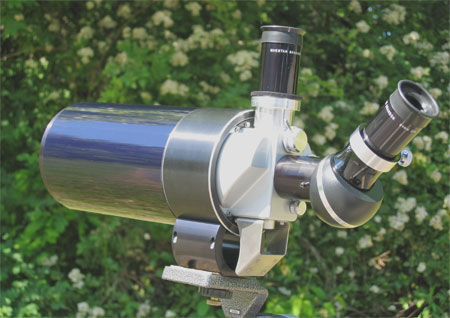
Right: Questar Questar Field Model telescope with Image Erecting Prism, Slip Fit Low Profile Adapter (PN 19431-03A), and second Eyepiece (42,858 bytes). Attaching the Image Erecting Prism
* Specifications given are as measured by Company Seven in April 2006, subject change.
Right: Questar Image Erecting Prism with Axial Port fitting attached (25,660 bytes). MAINTENANCE AND CLEANING INSTRUCTIONS:
For more information about how to work your way through the decision making process of choosing and specifying a Questar 3-1/2 telescope, their common accessories, and desirable options please feel free to call us or send an E-mail inquiry, or visit our showroom. You may find more help by referring to the articles in our Questar Library section on line.
|
|||||||||
|
|
Contents Copyright 1994-2006 Company Seven All Rights Reserved |
