|
C-7 Home Page
Losmandy Overview |
|

|
 The Losmandy Pole Finder is a compact 5X telescope that is threaded into several of the Losmandy German Equatorial Mounts. Losmandy makes this document available on line to help customers who find the non illustrated manual inadequate. The Losmandy community appreciates the contributions of people including Mr. Kodama, for taking the effort to produce this well illustrated document.
This document covers the older Losmandy reticle (with the errant pattern), as well as the current model. Furthermore, it provides assistance for our Southern Hemisphere neighbors. Company Seven recommends that rior to use one must assure the Pole Finder axis is parallel to the axis of rotation of the Mount, otherwise any asymmetry will introduce errors to the alignment process described below.
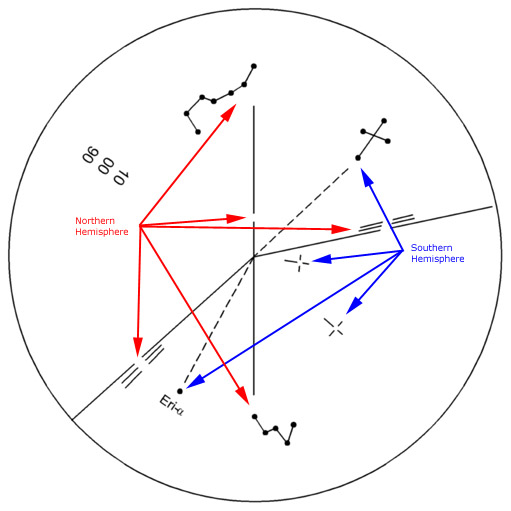
LOSMANDY POLE FINDER RETICLE INSTRUCTIONSBy David A. Kodama for Losmandy Hollywood General Machining, All Rights ReservedShown below are two images of the Losmandy Pole Finder Reticle. The Figure 1. illustrates the current reticle pattern. While Figure 2 includes a diagram of the reticle view which has been annotated to make things clearer.
Fig. 1. Losmandy Polar Finder Reticle
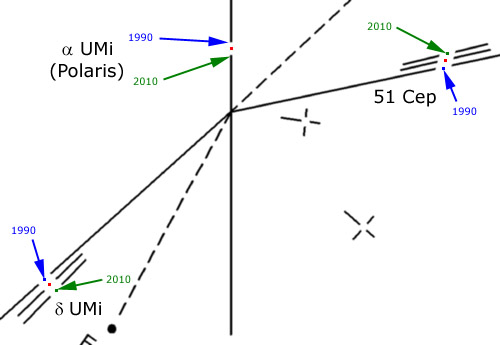
The first thing to note is that the finder is meant to do double-duty. There are markings applicable to the Northern Hemisphere (red arrows in figure 2), and there are markings for the Southern Hemisphere (blue arrows). In some finders, the lines are actually labeled with "N.H." and "S.H." The important thing is to ignore the set that isn't relevant to you. Since I'm located in the Northern Hemisphere, that's what I'll discuss below first. Northern Hemisphere Alignment The second thing to note is that the constellations shown (Cassiopeia and the Big Dipper) will not be visible in the finder itself. These are used in the first step, which is to rotate the reticle until the constellation references approximately match the current sky orientation. This should be done after first orienting the mount well enough to at least place Polaris in the view of the finder. Once the coarse rotation has been set, you can then place Polaris in the gap (indicated below in figure 3) using the azimuth and elevation adjustments of the mount. In some polar finders, the words "Place Polaris Here") are also etched on the reticle. Note that as shown in figure 3, the exact position of Polaris changes, depending on epoch.
Then, using a combination of the azimuth and altitude adjustment and fine tuning of the reticle rotation, place the second brightest star (Delta Ursa Minor) in the gap indicated. In some finders, you may find the words "Place Second Star Here." The three sets of lines/gaps are for the epochs 1990, 2000, and 2010. In the diagram above, the red dot in the middle position indicates the epoch 2000 position. These may be marked cryptically with "90", "00", and "10" in some finders as shown in figures 1 and 2. If you have a dark observing location, you may also be able to see a faint third star. Place this in the third (unlabeled) set of lines/gaps, again using the altitude, azimuth, and possibly rotation of the reticle. If I am able to use the third star, I generally find that I am quite accurately polar aligned, and this considerably reduces the amount of time necessary to finish off with drift alignment. Gotcha! #1 -- Wrong Finder Magnification The procedure above sounds pretty straightforward, and if you're lucky, that's all there is to it. However, if you are unlucky like me, you got one of the defective polar scopes that came with some G-11 systems! These have the problem of incorrect magnification relative to the reticle. In my setup, the two stars end up sitting not in the gaps but on the lines closer to the center (indicated by red spots in the figure 4). If you don't know this, you'll undoubtedly have pulled out some hair trying to figure out why you just can't get the stars to fit.
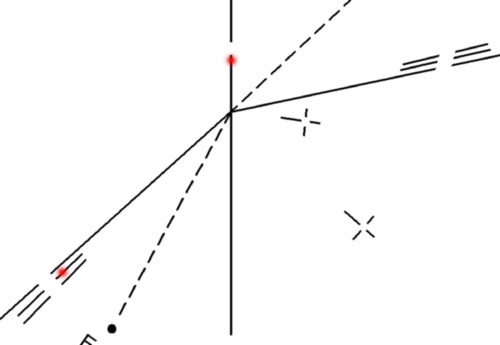 Fig. 4. Northern hemisphere
star placement in bad reticles (2000).
Fig. 4. Northern hemisphere
star placement in bad reticles (2000).Gotcha! #2 -- Reticle Illumination Too Bright Another common problem is that the illuminator that comes with the polar finder is often too bright, obscuring the dim second and third stars. To take care of this problem I now have a custom illuminator power supply box for my G-11 (the Kenko mount has an adjustment) which has a rotary selector to brighten or dim the illuminator as required. An alternative low tech solution is to take a black marker or paint or nail polish and paint the LED down to the point where it isn't blinding you. Gotcha! #3 -- Mis-centered Reticle One final item which may trip you up is the possibility that the reticle may not be centered properly. The symptom of this problem is excessive dec tracking error even though you have carefully aligned your mount with the finder. To check and possibly adjust this, you will have to first carefully drift align your mount, then try to rotate the reticle to its proper position. If you find that you cannot do this, you can try adjusting the 3 tiny set screws which are on the same surface that the illuminator screws into. Please note that I have not done this myself, so I can't say how easy it is to do (or mess up). If you don't feel confident doing this, it may be best to simply note the offset for the pole position relative to the markings on the reticle. Southern Hemisphere Alignment Southern Hemisphere alignment appears to be harder to do because of the lack of bright stars, but the basic procedure is the same. In this case, the Kenko mount instructions recommend first using a compass to set the mount up in approximate alignment towards the pole. Next, rotate the reticle until the Southern Cross and Alpha Eridani are in the correct approximate orientation (again not actually visible in the reticle). Finally, place the stars of Octans in the indicated positions using the mount's altitude and azimuth adjustment as well as fine tuning of the reticle rotation. Note that the edges of the tick marks are used also to indicate the exact positions for the epochs 1990 and 2010.
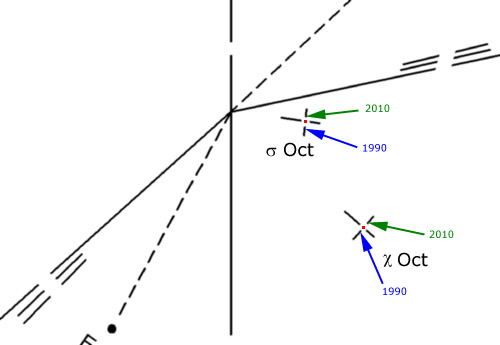 Fig. 5. Southern hemisphere
star placement.
Fig. 5. Southern hemisphere
star placement.Since both reference stars are practically in line with the pole, I would expect that alignment would not generally be as good as for the Northern Hemisphere. I haven't had a chance to personally try the Southern Hemisphere procedure, so someone down there will have to let me know if it works as advertised. At any rate, no matter how well you set up using the polar scope, final adjustment for astrophotography via a telescope or long telephoto lenses must be done with drift alignment. For wide angle photography away from the poles, this alignment may be adequate.
Copyright 1999-2000 David A. Kodama, All Rights Reserved |
|
|
Contents Copyright 1994-2002 Company Seven - All Rights Reserved |