 File Organization Within CEUS:
The CEUS will appear on a network as another personal computer named “pc-combo”, and with the contents in a drive directory within labeled “Data (E)”. The music files are stored within the CEUS directory “Data (E)” and arranged within this directory in subdirectories or folders.
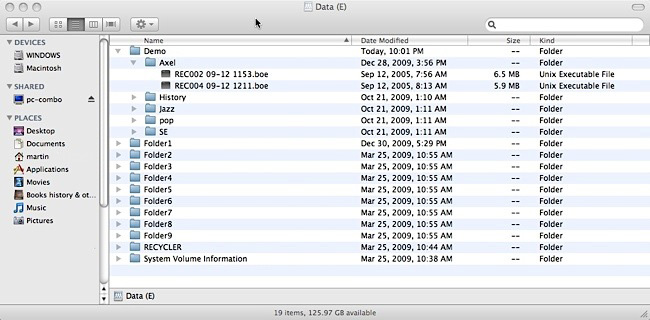
Above: CEUS drive directory “Data (E)” showing folders or directories within, as arranged from the factory; you can rename them at will.
Click on image to see enlarged view. Note, pop-up windows must be enabled in your Browser.
The “Demo” directory (or folder) stores some one hundred forty (140) complete music files in .boe format that are provided by the factory with the CEUS. The folders within the Demo directory are: Axel, History, Jazz, pop, and SE. The directories “Folder1” and “Folder2” include the provided additional .boe and .mid format music files. To see a screenshot of the desktop with these directories open revealing the .boe files click here to open a new tab in your Browser then enlarge the image (zoom in) as desired.
The other directories “Folder1” through “Folder9” may be used for storing the provided collection comprising some seven gigabytes of .boe song files, your newly recorded CEUS .boe music files, or other imported files arranged to play in the order as preferred by the user. Other directories can be created too using the existing directories (folder 1-9) for your new playlists, or within the directory “Demo”. You can rename the folders as desired.*
For example the user can create a new directory under “Data (E)” and name this new directory “Dining” for music to be played as background music while dining. Next copy the desired .boe files from other directories within CEUS or from another CEUS instrument and then load the directory into your CEUS.
Understand the CEUS will play the files with any directory in alphabetic or numerical order. So if you want CEUS to play songs in some order of preference then copy the tracks into the desired director naming the tracks* with some prefix “a concerto no1”, “b dinnermusic7”, “c ....” and so on. This can quickly be organized on the PC, then loaded onto the CEUS. Or you could have USB Flash Drive/Memory Sticks with the various performance programs, and access the USB directory from the CEUS piano keyboard to play.
*If you rename any track or folder then use conventional letters (uppercase and or lowercase), or numbers; there can be spaces between these but not at the end of the name or CEUS will not play the file. I found a half dozen files provided with my CEUS that had a filename with a space then the .boe suffix and while these were recognized by CEUS and could be selected, the file would not play until I edited the file name to remove the space.
Do not include symbols in the name such as ! " $ % & /. The file name should be no longer than eighteen (18) letters and or numbers, including any spaces.
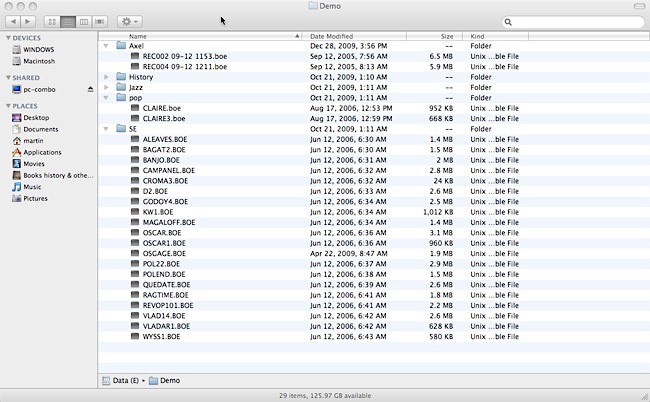
Above: CEUS drive directory “Demo” showing several of the folders or directories within, and music .boe files within those folders.
Click on image to see enlarged view.
Bösendorfer CEUS Can Plays Back Single or All Songs: A Wonderful Feature!
CEUS can be set to play back a .boe music file that you navigate to and select by title. It is also possible to arrange several .boe songs in a file directory to be played back, and in the order desired to be played back. This order can be either by number (01 first song, 02 second song, etc.), or by title in alphabetical order.
To do this, after CEUS has started enter the settings selection menus by select the black C#/Bb piano key directly below the farthest left icon (an arrowhead pointing to the right, with a line above the icon) and depress the key. Go to the brass buttons at left and select the menu, then tap on the top or bottom buttons to navigate up or down to the “Playmode:” menu. In this menu you can select either “Playmode: single” (the default) or “Playmode: all”. After selecting the preference then tap on the "enter" brass button, next exit the menu by tapping the brass button to the left. Selecting "all" will direct CEUS to playback the entire contents of the first and following songs within whatever directory you navigate into.
With this feature:
1. an artist could record several songs on the CEUS, saving them as .boe files, then arrange the songs within a directory to play them back in the order desired. The artist can experience absolutely how their performance (rehearsed for live, or for an album or CD, or download) might sound and present best to the listener.
2. Directories may be arranged in ways so that music appropriate for an event could be played. Directories might be named and their contents arranged for Christmas, dinner, dancing, etc.
3. Where desired, a timed interval in the form of a .boe file recording no piano activity, can be inserted in between songs as a pause to support some event program. This could be a time period for announcements, or an interval to allow discussion and critique, etc. Of course, one can always manually pause the Bösendorfer CEUS at the keyboard or through networked remote operation of the Bösendorfer CEUS software.
Afterwards do not forget to change the Playmode back to whatever you normally prefer.
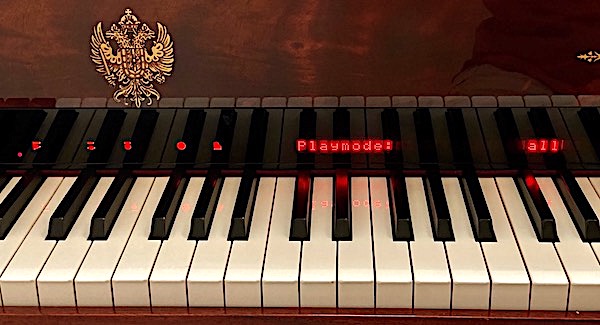
Above: CEUS LED display showing menu icons, and with Playback option set to “all”.
Note my iPhone has a difficult time clearly photographing LEDs however, to the eye the letters are sharp and clear (57,757 bytes).

 Communicating With CEUS:
Initially there were two ways by which one can connect the CEUS to a network, these involved connecting through the Ethernet port to a network or directly to another computer:
1. Connect the CEUS computer by mens of its LAN port into a network by means of either a Router or Network Switch. This uses a conventional networking cable sometimes referred to as a “Straight-Through” or patch cable connected from the LAN port and into the Router or Switch. The networking device may be wireless or hard wired though I personally prefer hard wired networks as they are more secure and less susceptible to radio frequency interference from other devices.
2. Direct connect the CEUS computer directly to another computer by means of a cable. This is a networking cable that differs from conventional networking cables and is usually identified by a label “Cross Over”.
The network approach allows CEUS to communicate with numerous devices, even another CEUS or other computer located around the world. The direct connect method only works with one component at time unless you are using that computer to show the CEUS as an attached drive.
By September 2010 L. Bösendorfer Klavierfabrik perfected an optional wireless solution for the CEUS. This and how it is provided on my Imperial Piano CEUS is described later in this article.
|
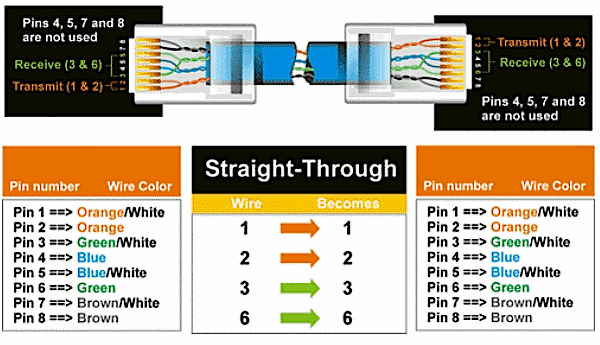
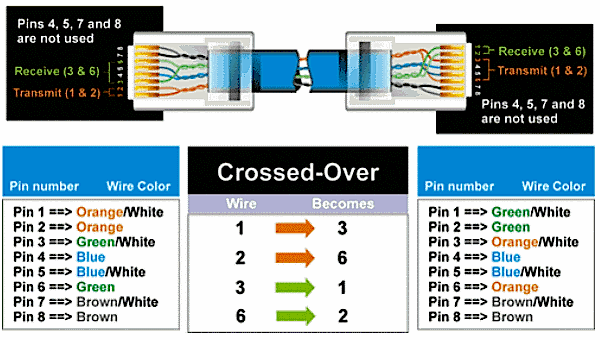
Above: at the top is the Ethernet connection cable typically used in home and business networking, this is the Straight-Through or patch cable.
Below is the less common Cross Over cable used only when connecting one network ready device directly to another similar unit, that can be a computer or other device.
Images above courtesy of CISCO, used by permission.
 One Improvement Was Suggested:
When on 28 December 2009 my piano was delivered with the CEUS I envisioned having CEUS connected to my home network via an Ethernet cable. This cable would be run from below the piano since this would be less conspicuous, and I will be able to leave it connected even when not in use. When the piano arrived the CEUS factory implementation on my Imperial piano provides that the sole access to the LAN port is at the panel, this is inside the cabinet and can be accessed only from the top side of the piano. However, as delivered this panel can only be accessed with the piano lid open or off; there is no way to leave cables connected to my CEUS when the lid is closed. After Wi-Fi communications capability was added to my CEUS (see below) this cable access issue was rendered inconsequential for my purposes.
I contacted Bösendorfer GmbH asking for advice about how I might be able to access the CEUS from below. Their reply was to relocate the panel from above to below the piano. After a brief evaluation of this I concluded relocation was not the best option since:
1. relocating the panel to below the piano leaves unsightly holes for cabling and for attachment screws
2. only an experienced CEUS technician should ever attempt to work on the system
3. I prefer a solution whereby the user can connect either from above or from below.
I asked Bösendorfer GmbH if they could provide a second RJ-45 LAN port to be accessible from below the piano, or at least give the customer the choice of whether they prefer the communications ports panel to be installed to be accessed from atop or below their piano. In the meantime I studied the installation and determined the computer component of the system is manufactured by Nexcom International Co. Ltd. This component incorporates an Intel Core 2 Duo Mobile CPU with 1 GB RAM with an 80 GB Hard Disk. The operating system is Microsoft Windows® XP. The system incorporates a long-life Lithium “button battery” to maintain settings in the memory, this should be replaced every few years; that might be a good service interval to have the CEUS upgraded - an even more efficient and quicker-booting Solid State Drive or larger capacity drive replacing the original for example.
As seen from below the piano this chassis is:
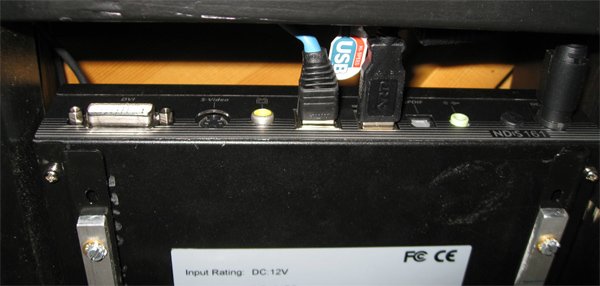
Above: CEUS Computer CPU as seen from underneath my piano showing most of the available ports: DVI (video),
S-VHS (video), Phono (composite video), RF-45 (Ethernet), USB (spare port just above the connector in use),
SPDIF (optical digital audio), Stereo Phono (Audio), and 12 volt DC power in.
Click on image to see enlarged view.
I noticed the Nexcom CPU provides USB ports but only one which is in use (shown above) as it was installed at the factory. So a second Ethernet RJ-45 port could be provided to the CEUS by attaching a compact Network Switch that is powered from an unused USB port. One of the more compact and low current draw devices (as of Spring 2010) is the 3 port switch made by CyberData Corporation. This switch has a female USB Type B port that is connected to a USB port through a common USB A to B connector cable to obtain the required 5 volts DC power.
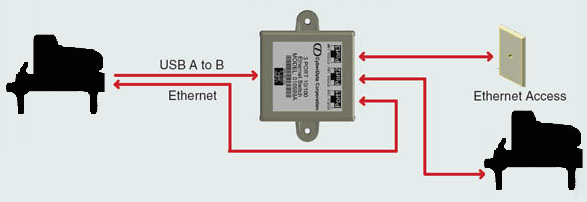
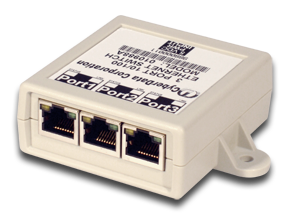
Above: CyberData Corporation 3 port Ethernet switch as I envision it installed into my piano to provide the second connection port below the piano.
Since the Nexcom CPU is basically a PC computer I considered the possibility of networking it to another Microsoft Windows® XP computer, using the Remote Access to install software drivers to configure a wireless USB adapter. Going wireless first requires making note of the name and the password of the home wireless router so that if changes are made to the network (the wireless router is replaced for example) then one can simply provide a similarly named router wherever the CEUS equipped piano is located rather than adjusting the CEUS PC's Network Connection settings.
But then…
 Wireless 802.11n:
While continuing my research about the CEUS I contacted the manufacturer of the Nexcom PC computer, then obtained their comprehensive and well illustrated instruction manual. As I read the manual I was surprised to learn the CEUS computer is provided by the manufacturer with one mini Peripheral Component Interconnect Express (PCIe) expansion slot so that it will accept an optional Wireless WiFi Link Card. The WiFi Link Card will permit communication between the CEUS and a Wireless Local Area Network (WLAN). The WiFi card can be replaced, upgrading as the 802.11 technology evolves (b, g, n, etc.). If Bosendorfer GmbH would offer this as an option before a CEUS piano is delivered then they could install a WiFi Link card at the factory, then upon delivery a factory technician could adjust the software settings to connect the CEUS to the customer's WLAN. I had been spinning my wheels for six months looking for a solution that is already there.
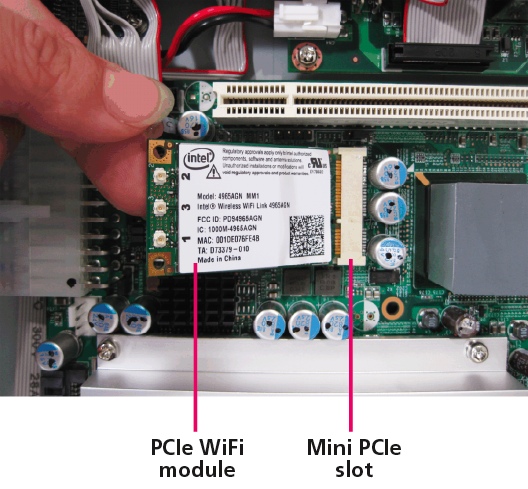
Above: Installation of optional Wireless WiFi Link card into CEUS PC; image from the instruction manual.
Note I DO NOT recommend any CEUS owner risk violating the terms of the CEUS warranty by tampering with this.
Click on image to see enlarged view.
 Following discussions with Bösendorfer GmbH, to my surprise they promptly took the recommendations of providing the option of wireless connectivity to heart. They invested in research and software programming to make it possible to offer this new wireless CEUS system based upon the current most efficient 802.11n standard. This is a recent amendment which improves upon the prior 802.11 standards by adding multiple-input and multiple-output antennas (MIMO) Spatial Multiplexing, this provides higher spectral efficiency (more bits per second per hertz of bandwidth) and link reliability or diversity. The 802.11n also provides many other new features.
The ramifications for networking two or more CEUS systems by means of higher speed wireless connections can only be surmised. But for me this means less wires visible as only one AC power line runs to the piano and into a nondescript surge protector/power strip. It also means that anyone who visits my home can connect (with the provided password) onto the network thereby communicating with CEUS too. New Bösendorfer customers will be able to order the wireless capability as a factory installed option for their CEUS. Fortunately, current owners of the CEUS can have this retrofitted to their piano by a Bösendorfer technician on site; the piano need not be returned to the factory to have this installed. By now anyone who wanted networking capability for their CEUS probably installed the Cat5/6 cables connecting to their CEUSs' networking port, connecting that to either a wall outlet or to some wireless device.
Consider that hard wiring the CEUS with High-Speed Downlink Packet Access (HSDPA cat.6) cabling and components provides up to a 3.6 megabit per second data transfer rate. The prior 802.11g standard provided peak data transfer rates on the order of 6.59 megabytes per second (54 mbits/s). The current 802.11n with three antennas (MIMO) provides a peak rate of 73.24 megabytes per second. As I scanned through the music .boe files provided with the CEUS from the factory I found most of the longer compositions (Beethoven's 5th Symphony, 2nd Movement for example) are data files of 10 megabytes or so. Comparing some of the popular current data transfer standards we can estimate the time to transmit that file:
| Standard |
Max. Data Rate |
Max. Data Rate |
Time to Transfer one
10 mbyte file |
| HSDPA (cat.6) |
3.6 Mbit/s |
0.44 Mbytes/s |
21.19 Secs |
| 802.11g |
54 Mbit/s |
6.59 Mbytes/s |
11.58 Secs |
| 802.11n (MIMO) |
600 Mbit/s |
73.24 Mbytes/s |
1.04 Secs |
The current 802.11n standard far exceeds the practical concerns that may be raised by wireless data handling for the CEUS since the maximum raw data transfer rate potential is now 600 Mbit/sec.
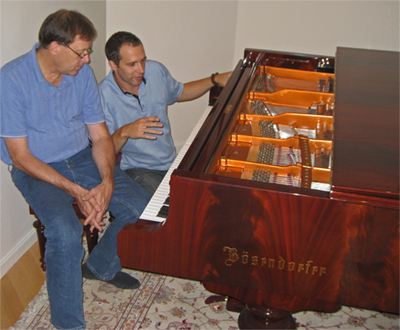
On 6 September 2010 Jan Sauerzapf the lead CEUS piano installation technician from L. Bösendorfer Klavierfabrik and Tom Kaplan, a Registered Piano Technician (RPT) working for Bösendorfer USA, visited my home to retrofit my CEUS for secure wireless networking. This was the first installation of this capability for a CEUS piano in the field. The work over two days included installing a new PC that incorporated the wireless LAN components, the attachment of three nondescript black 'MIMO' antennas in lower areas of the piano frame, setting up the CEUS to automatically log onto the home network, then checking and adjusting the CEUS for nominal operation. Then they checked the regulation and tuning as well.
Right: Jan Sauerzapf (at right) with Tom Kaplan finishing up the CEUS wireless installation and system checkout on my Imperial Piano on 7 September 2010. It was at this moment when as I took the photo that I thought I overheard Jan explaining to Tom “and when you push this button the entire piano blows up”.
Click on the image to see an enlarged view.
The installation is fairly transparent in that this adds virtually no visible signs that the technology is in place. If one looks underneath the piano then one may see one or two of the three antennas that are necessary to obtain the full benefit from the 'n' MIMO technology. Furthermore, this adds no additional work for the user since the Microsoft Windows® XP operating system of the CEUS PC has been set up by the technician on site to automatically search for and join the selected network. If one changes their wireless router or relocates the piano then it is a simple matter to rename a new wireless router with the same name as the original router, and then set the router to the same password.
The solutions I have been exploring do not address MIDI access from below. So for those of you who intend to use MIDI and other ports routinely then they may wish to have you CEUS Panel located by the factory for access from below, or possibly Bösendorfer GmbH can offer the option of a second panel installed below. I mention this so that anyone who thinks about buying CEUS can discuss their preference with the factory in advance.
|
|
|
OK, Let's Connect: Cross Over
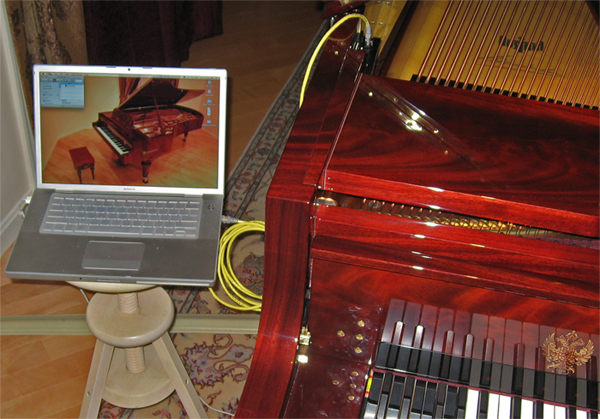
the first moments I experienced the CEUS performing were exciting, and I was eager to see what is in the CEUS computer. Furthermore, I was eager to back up the CEUS files lest I make some mistake while on the learning curve and accidentally delete data on the CEUS. However, I had not yet ordered the installation of a suitable Ethernet port near the piano to connect it into my home network, and so I connected to CEUS directly by means of a Cross Over Cable.
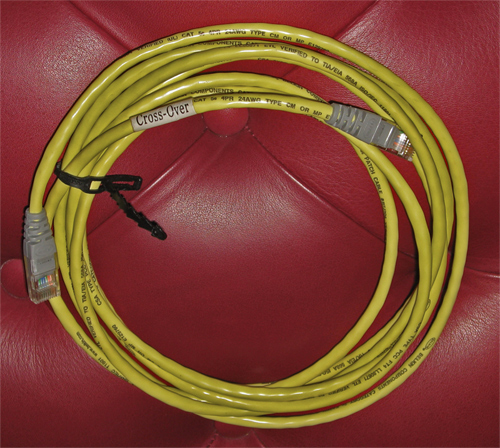
Above: my Cross Over Cable with RJ-45 connectors. In addition to clear labeling I buy cables for my systems with some sort of color code so that the cables
are less likely to be mixed up. So my Cross Over Cables are yellow, distinct from my Straight Through Cables which are blue, gray, green or red.
Click on the image to see an enlarged view. Note, pop-up windows must be enabled in your Browser.
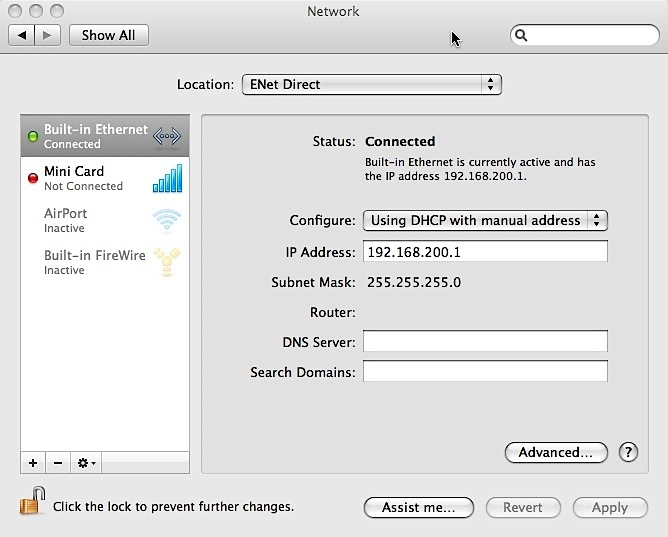
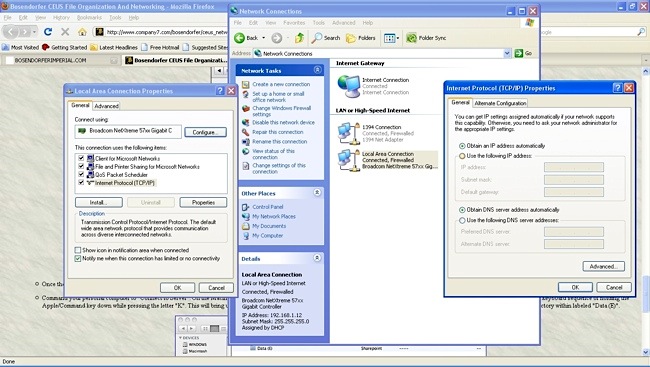
- Once the DHCP and IP address settings were entered give the computer a little time to assign and display the Subnet Mask. On my computer this is the “255.255.255.0” shown in the above window.
- Command your personal computer to “Connect to Server”. On the Macintosh OSX click and draw down the “GO” menu at the top of the Finder, selecting “Connect to Server” or alternatively use the keyboard sequence of holding the Apple/Command key down while pressing the letter “K”. This will bring up a window where the CEUS appears as another personal computer with the name “pc-combo” with the contents in the directory within labeled “Data (E)”.

DON'T FORGET: after you have completed your direct connect networking session with the CEUS set your computer networking settings back to their original configuration so that you can access the Internet or your own network.
Let's Connect: Straight Through
to the CEUS by means of conventional networking. To do this simply plug a conventional Straight Through Patch Cable with the RJ-45 connectors from the CEUS LAN panel into the wall port of a home network, into a wireless router device port, or into a switch device port. The CEUS should come up on the home network by using a connect to server or browse for server command from your personal computer, or look for the CEUS by its factory assigned IP address “192.168.200.2xx”.
By using this technique you will not have to change any settings on other devices attached to your network.
Let's Connect: Wireless
to the CEUS by means of the optional wireless networking. To do this simply power on the CEUS and it will automatically look for the wireless router by name, “Home Router” or “Netgear” for example. Next the CEUS will transmit the password to the router and log onto that network. This information will have been set up upon delivery by the Bösendorfer Klavierfabrik technician. CEUS appears on the network as the pc-combo device.
By using this technique you will not have to change any settings on other devices attached to your network.
BACKUP: I recommend the first thing you do after first attaining connectivity is to backup every file in the Data (E) directory onto a USB Flash Drive or to another safe location. On my CEUS, as delivered, the amount of data was something just under 700 mb so this original configuration can then be burned to a CD or DVD and stored with the CEUS manual, or kept on a USB Flash or conventional backup drive.
By having this backup you can easily restore any files you might accidentally delete while trying to learn how to navigate the CEUS menu and command key structure.
If you are creating new music or editing files, then common sense should dictate you perform periodic backups - maybe backing up to new media so that you can retain prior edits.
For Further Reading:
 Bösendorfer, No. 3 | November 2008. This color illustrated twenty (20) page periodical contains numerous articles including interviews with András Schiff and also with Ildikó Raimondi, news about the opening of the Bösendorfer flagship store in Tokyo, articles about piano manufacturing and maintenance. Of particular interest here is the article "CEUS Master Class at the Salzburg Mozarteum" explaining the Austrian-Chinese Music University Project where a networked master class was conducted between the Mozarteum University in Salzburg and the China Conservatory in Beijing with two Bösendorfer CEUS computer grand pianos. Contents copyright Feb. 2009 by L. Bösendorfer Klavierfabrik GmbH. Provided as an Adobe .pdf file (4,751,468 bytes). Bösendorfer, No. 3 | November 2008. This color illustrated twenty (20) page periodical contains numerous articles including interviews with András Schiff and also with Ildikó Raimondi, news about the opening of the Bösendorfer flagship store in Tokyo, articles about piano manufacturing and maintenance. Of particular interest here is the article "CEUS Master Class at the Salzburg Mozarteum" explaining the Austrian-Chinese Music University Project where a networked master class was conducted between the Mozarteum University in Salzburg and the China Conservatory in Beijing with two Bösendorfer CEUS computer grand pianos. Contents copyright Feb. 2009 by L. Bösendorfer Klavierfabrik GmbH. Provided as an Adobe .pdf file (4,751,468 bytes).
- Bösendorfer BOEdit: CEUS File Editing Software color illustrated article written by the author of this site providing an overview of the CEUS file editing software BOEdit. The article, currently based on version 1.07, includes screen shots of the software, a brief review of the Note Editor and Track Editor work spaces, and some thoughts about where the software might be going in its future development - or at least what the author might like to see.
- Bösendorfer CEUS Maintenance Hints color illustrated article written by the author of this site providing insights to the CEUS PC interior arrangement. Also covered are items the owner of a CEUS might want to know more about. This includes some advice related to the author's experiences of following the CEUS Service Manual, v2.00 English.
 CEUS Music Library Overview. This forty-seven (47) page document lists the music library available for the CEUS as of August 2008 by L. Bösendorfer Klavierfabrik GmbH. It lists the songs by title, composer, performer, date, type (concert, opera, salon, etc.). Information provided as an Adobe .pdf file (1,554,514 bytes). CEUS Music Library Overview. This forty-seven (47) page document lists the music library available for the CEUS as of August 2008 by L. Bösendorfer Klavierfabrik GmbH. It lists the songs by title, composer, performer, date, type (concert, opera, salon, etc.). Information provided as an Adobe .pdf file (1,554,514 bytes).
 CEUS Music Library Overview Spreadsheet. This Microsoft Excel document lists the music library provided with the CEUS as of August 2008 by L. Bösendorfer Klavierfabrik GmbH. This is the same information as in the above file but ported into a spreadsheet format by the host of this site for the convenience of fellow CEUS owners. It lists the songs by title, composer, performer, date, type (concert, opera, salon, etc.) but since the information is provided as an Microsoft Excel file (148,703 bytes) the information can be sorted by preference of performer, composer, type of music, etc. CEUS Music Library Overview Spreadsheet. This Microsoft Excel document lists the music library provided with the CEUS as of August 2008 by L. Bösendorfer Klavierfabrik GmbH. This is the same information as in the above file but ported into a spreadsheet format by the host of this site for the convenience of fellow CEUS owners. It lists the songs by title, composer, performer, date, type (concert, opera, salon, etc.) but since the information is provided as an Microsoft Excel file (148,703 bytes) the information can be sorted by preference of performer, composer, type of music, etc.
 CEUS Music Library Overview Spreadsheet. Similar to the above but for convenience of Apple Macintosh computer users the information has been ported over (thanks to E. Zausmer) to an Apple 'iWork' Numbers spreadsheet format (217,596 bytes). The information can be sorted by preference of performer, composer, type of music, etc. CEUS Music Library Overview Spreadsheet. Similar to the above but for convenience of Apple Macintosh computer users the information has been ported over (thanks to E. Zausmer) to an Apple 'iWork' Numbers spreadsheet format (217,596 bytes). The information can be sorted by preference of performer, composer, type of music, etc.
 CEUS Service Manual, v2.00 English. This color illustrated twenty-two (22) technical service guide for the CEUS system, revised July 2011. There is very little of use here for the owner as only a factory-trained technician should ever be called upon to service a CEUS. However, this clearly illustrates and explains much about the CEUS components and how they interact. Contents copyright L. Bösendorfer Klavierfabrik GmbH. Provided as an Adobe .pdf file (1,755,630 bytes). CEUS Service Manual, v2.00 English. This color illustrated twenty-two (22) technical service guide for the CEUS system, revised July 2011. There is very little of use here for the owner as only a factory-trained technician should ever be called upon to service a CEUS. However, this clearly illustrates and explains much about the CEUS components and how they interact. Contents copyright L. Bösendorfer Klavierfabrik GmbH. Provided as an Adobe .pdf file (1,755,630 bytes).
 CEUS User’s Manual, v2.02E English. This color illustrated fifty-six (56) page operating guide for the CEUS with operating system, revised 31 August 2011. CEUS is so capable a system that one should read the documentation and carefully explore the possibilities, there will be a learning curve. Contents copyright L. Bösendorfer Klavierfabrik GmbH. Provided as an Adobe .pdf file (2,756,859 bytes). CEUS User’s Manual, v2.02E English. This color illustrated fifty-six (56) page operating guide for the CEUS with operating system, revised 31 August 2011. CEUS is so capable a system that one should read the documentation and carefully explore the possibilities, there will be a learning curve. Contents copyright L. Bösendorfer Klavierfabrik GmbH. Provided as an Adobe .pdf file (2,756,859 bytes).
- Measurement and Reproduction Accuracy of Computer-controlled Grand Pianos by W. Goebl and R. Bresin, Proceedings of the Stockholm Music Acoustics Conference August 6-9, 2003. Journal of the Acoustical Society of America, vol. 114, no. 4, pp. 2273-2283, 2003. This is interesting reading comparing the 290SE system of the 1980's with the then state of the art Yamaha Disklavier Grand Piano. L. Bösendorfer Klavierfabrik GmbH was aware of this document and so it could be interesting to see how the modern CEUS improves upon the 290SE and Disklavier by repeating the experiment. The author of this site found the complete four page article online however, I am not sure if this can be freely distributed here.
Abstract: the recording and reproducing capabilities of a Yamaha Disklavier grand piano and a Bösendorfer SE290 computer-controlled grand piano were tested with the goal of examining their reliability for performance research. An experimental setup consisting of accelerometers and a calibrated microphone was used to capture key and hammer movements, as well as the acoustic signal. Five selected keys were played by pianists with two types of touch ("staccato" and "legato"). Timing and dynamic differences between the original performance, the corresponding MIDI file recorded by the computer-controlled pianos, and its reproduction were analyzed. The two devices performed quite differently with respect to timing and dynamic accuracy. The Disklavier's onset capturing was slightly more precise ('10 ms) than its reproduction (-20 to +30 ms); the Bösendorfer performed generally better, but its timing accuracy was slightly less precise for recording (-10 to 3 ms) than for reproduction ('2 ms). Both devices exhibited a systematic (linear) error in recording over time. In the dynamic dimension, the Bösendorfer showed higher consistency over the whole dynamic range, while the Disklavier performed well only in a wide middle range. Neither device was able to capture or reproduce different types of touch.
Contact the owner of this piano.
|
![]() Audio & Video Files
Audio & Video Files ![]() CEUS
CEUS ![]() Image Gallery
Image Gallery ![]() Interesting Articles
Interesting Articles ![]() Links
Links ![]() History & Specifications
History & Specifications

![]() Introduction:
Introduction:


 Following discussions with Bösendorfer GmbH, to my surprise they promptly took the recommendations of providing the option of wireless connectivity to heart. They invested in research and software programming to make it possible to offer this new wireless CEUS system based upon the current most efficient 802.11n standard. This is a recent amendment which improves upon the prior 802.11 standards by adding multiple-input and multiple-output antennas (MIMO) Spatial Multiplexing, this provides higher spectral efficiency (more bits per second per hertz of bandwidth) and link reliability or diversity. The 802.11n also provides many other new features.


