Home Page ![]() Audio & Video Files
Audio & Video Files ![]() CEUS
CEUS ![]() Image Gallery
Image Gallery ![]() Interesting Articles
Interesting Articles ![]() Links
Links ![]() History & Specifications
History & Specifications

-
Bösendorfer CEUS Maintenance Hints
- The CEUS incorporates a personal computer with memory and a hard disk drive. Over the course of production Bösendorfer employed a few different versions of PC, the early ones each with Windows XP while the later PC's had Windows 7 installed. These CEUS PC's can have VGA and/or the later DVI video port, an HDD or SSD for storage of files, while their BIOS can be different too. These PC's are compact, and all share a design that does not need a fan so there is no fan noise or RF generated. My CEUS PC chassis is attached to a metal 'H' shaped framework, that in turn is bolted into the frame of the piano and held on by four long wood screws; this is practical to access, but I suggest mere mortals avoid tampering with this without first consulting with the factory experts.
My CEUS PC is still operating under its original and reliable Microsoft Windows XP operating system. While Microsoft has released newer versions of Windows, and Windows 7 was provided with some later production CEUS PC's, there has been no need to upgrade the operating system of my CEUS computer.
I do caution against arbitrarily updating the Windows OS of the CEUS because 1. newer may not only be no better, and 2. a newer operating system can be incompatible with some of the early 2000's technologies in the CEUS. For example my CEUS had WiFi added to it in September 2010; to do this required installing an Intel® Wireless WiFi Link 4965AGN card, plus the MIMO antennas. This WiFi convenience has worked well under my Windows XP, and should work at least up to and including Windows 7. However, by the time Windows 10 was released the Intel® Wireless WiFi Link 4965AGN had reached "End of Interactive Support", and no further updated software drivers were being produced for it. So, if you update CEUS to Windows 10 or later, then the wireless card will not work. I have no ideal what other CEUS components will or will not work since I am not interested in having anything that Bösendorfer Tech Support does not specifically recommend.
- My generation of CEUS computer was built from an off-the-shelf product manufactured by Nexcom for Digital Signage applications, the NDiS 161D2, P/N 10W00016104X0. It has been customized to suit the CEUS system.The dimensions of the 161D2 are W: 280mm x D: 210mm x H: 40.7mm. I know the expression "technology has a short shelf life" will certainly apply to the CEUS, so I am looking into buying a second CEUS PC as a backup unit. If you buy a spare CEUS PC then it will be best to procure this through Bösendorfer Klavierfabrik GmbH, Vienna, so their CEUS technician can configure it for you.
- The CEUS PC is powered from the power supply built onto the underside of the Bösendorfer piano. When you turn on the AC mains power, at the toggle switch under the piano, then this activates the power supply that proportions appropriate voltages to the respective CEUS components.
The CEUS PC awakens as the BIOS is activated. The BIOS holds settings, most customizable, that dictate how the PC is to awaken including what components should start or be restarted, and in what sequence. When powered-on the SATA hard disk drive spools up, the main logic board is powered, the PC graphics DVI port, the CEUS processor and the LED display at the keyboard are powered, and other functions (WiFi, etc.) are powered. The Bösendorfer CEUS application software, also stored on the hard drive, is among the software applications set to start up when the PC is powered on. These come on only after the AC toggle switch is activated "ON", and they power down when the main AC switch is turned off; this is important to note.
The next step to complete the full start up is to raise the Fall Board (the piano keys cover board), once raised the CEUS scrolls startup messages across the inner face of the Fall Board. Should you lower the Fall Board, this will put CEUS to sleep, but does not shut down the CEUS PC; so you could access the PC on your home network for example, at least until the main power switch is toggled to 'OFF'.
- The original CEUS PC incorporates a 2.5-inch form factor hard disk drive (HDD). This incorporates high speed (mine is 5400 rpm) rotating platters, and was originally capable of up to 250 gigabyte data storage capacity; for comparison by the time this article was written drives of up to 26 Terabyte (TB) capacity are available. My .boe files rarely are longer than 10 to 12 minutes, and so these typically ranging from under 1 megabyte to 11 or more megabytes files each. So this 250 GB drive has plenty of capacity to store many .boe files, and of course the Windows and CEUS operating software.
- The connector for signal and power from the PC motherboard to the HDD is the still-popular SATA (Serial ATA) connector; this is fully satisfactory to move the amounts of data used or generated by CEUS. Being a popular format, the SATA makes it a simple matter to disconnect one HDD, and replace with another.
It is not too complicated to upgrade the standard HDD to a larger capacity or just a newer HDD as desired. An alternative is to record on the CEUS, but then migrate the saved .boe file over the network to your studio's PC's for processing, mixing, and for archiving. Refer to Bösendorfer CEUS File Organization and Networking color illustrated article to better comprehend the file organization structure of the CEUS, how to connect to CEUS by means of Straight Through or Cross Over cables, by Wireless, and how to access the CEUS on a network.
- The technology of the standard HDD relies on magnetic recording technology, this has some lifespan issues so you cannot count on all the data written to be there many years later. Because the HDD have two motors and other moving components, they do take a little time for the rotating platters to spool up to speed for the data to be written or read. Anything that is motorized and has to move adds another failure mechanism that is possible over years of use.
When the CEUS PC is powered on and the piano key cover raised, then you can hear a soft singe beep tone to let you know the system is powered, and the LED display at the keyboard provides the status. If you crawl under the piano to nearby the CEUS PC, within about one foot away, and power on the CEUS then you can barely hear the conventional HDD coming up, so it is pretty quiet and does not intrude on recording sessions unless a microphone is placed underneath and nearby the CEUS.
- Among the newest consumer data storage devices are the Solid-state drives (SSDs); these were available at a notably higher cost and with modest capacities when the last production CEUS PC's were made incorporating an SSD. The SSD, sometimes termed a flash drive, has become more popular than HDD, and affordable particularly since the mid to late 20-teens. The SSD stores data as does a flash drive with transistors that have a charge-holding capacity, and so these have no moving parts. Lacking the motors and moving parts, the SSD is silent, and draws less current from the system Power Supply. Their technology allows for much lower latency, access times, and with higher data-transfer rates. For CEUS the factors of note are silence and longevity as there is less to go wrong - not that data cannot be lost, but the SSD is less likely to lose your files than the conventional HDD.
- Lifespan of the SSD depends on factors including how often data is written to it. So for example a professional studio, or a very active household user of the CEUS, might do well to change the drive more often than a casual user.
- SSD's that are not routinely powered on can lose data. Owners who do not use their CEUS often, where the piano may be played without powering-on the CEUS for two or more years, may find their SSD losing data. According to research, an SSD can retain your data for a minimum of two (2), or up to five (5) years without being powered on. Recently, some of the better SSD manufacturers claiming their SSD can write and save data, without being powered on, for about ten (10) to fifteen (15) years.
So, plan on powering on the CEUS PC and having it play some recordings periodically, this can help maintain the SSD and moving mechanical components in working order. And when shopping for an SSD, do not necessarily 'low bid' the selection but pay attention to reliability and longevity specifications.
- Lifespan of the SSD depends on factors including how often data is written to it. So for example a professional studio, or a very active household user of the CEUS, might do well to change the drive more often than a casual user.
- I planned to change over my HDD to SSD because 1. I prefer the total silence of the drive, 2. because HDDs have moving mechanical components I expect my 13 year-old HDD may be in-line for some reliability/lifespan issues, and 3. I never object to reducing power demands (in use or in standby modes) from a Power Supply while also reducing possible heat output. As far as the speed of booting, or of access (reading) and writing the SSD is much faster than the HDD, but these really are non-factors for routine CEUS operations.
So when the time comes to replace the CEUS PC's CR2032 battery (see below) this is an opportunity to consider replacing the drive as a part of an extended five (5), ten (10), or even fifteen (15) year 'routine maintenance'.
- Whether you change the HDD or move to an SSD, keep in mind there are risks if you get this wrong. You could hire a certified PC technician to visit, pull the CEUS PC and do the upgrade for you. Or you could remove the CEUS PC, then take this to a professional technician to have the drive change done.
Should you do this on your own then you absolutely must mirror, exactly duplicate, the entire contents of the CEUS PC drive including it's: Microsoft Windows operating system, Bösendorfer CEUS software, and your .boe files directories. All must be copied onto the new drive prior to installing that new drive. The doit yourselfer can connect the CEUS PC through the network to another PC running appropriate copy software, then back up the CEUS's installed drive to an external back up drive then carry that external back-up drive to a technician to perform the service of formatting and then writing the data onto the new drive.
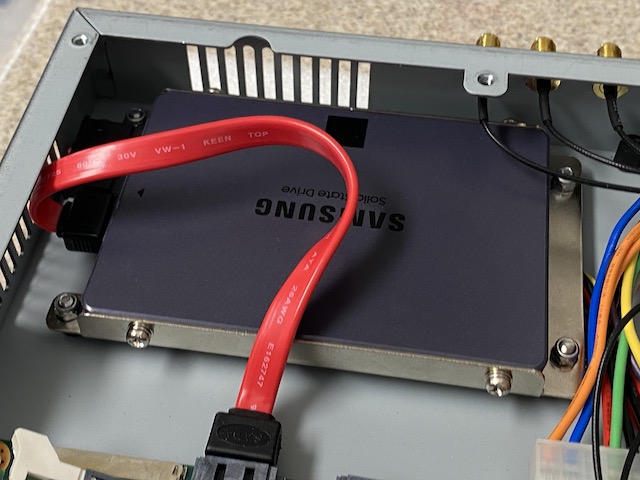 In July 2024 my own CEUS PC was updated by having the original Samsung 250 GB HDD, installed by the factory in 2009, replaced with a new Samsung 2 TB SSD. With the original HDD if I crawled under the piano near the CEUS PC, I could hear the original HDD's spooling up; while not heard far beyond the chassis of the PC I wondered if a very well placed microphone might pick this hum up during a recording session? However, the SATA is silent. Because the SATA SSD has no moving parts the reliability is improved, and of course 2 TB brings with it eight times (8x) the storage capacity of my original HDD.
The changeover mechanically is simple because HDD and SSD share the same disk form factor, the industry popular 2.5". So the new SSD drive fits into the same supporting hardware as did the original HDD. The new SSD is thinner than the HDD, the SSD being 0.27 inch (6.9 mm) thick, versus 0.4 inch (10.2 mm) of the HDD. The SATA interface (signal and power cable harness, red in the photo at right) connects onto the SATA socket of the original HDD or onto the SATA 6 Gbps interface of the SSD.
Right: new Samsung 2 TB SATA SSD as installed July 2024. Note the chassis ventilation slots that can help even an SSD.
Click on image to see enlarged view.
Another nice aspect of this changeover is the weight reduction. This transition from HDD to SSD shaved some 1.49 ounces (0.042 kg) from the weight of the piano; this should be some relief should I ever have to move my Bösendorfer Imperial piano.
- The PC's battery should be replaced periodically with a new CR2032; computer makers suggest the interval should be between three (3) to five (5) years.
- Extra care must be taken to not damage the fragile plastic battery holder, or its attachment points to the circuit board. I use a flexible thin plastic blade, instead of a metal screwdriver for example, to avoid shorting any terminals. Using a flexible blade also helps to reduce the force applied in the process of popping up the battery edge. I found a mid-size plastic wire tie works just fine for this, gently sliding it under the battery on the side of the battery holder that is opposite the topmost restraint tabs. The new battery slides in, with the positive side (marked "+") leading edge towards and just seating under the restarting tabs, then gently push the battery down to snap it into place.
- The CEUS system components built underneath the piano include a ventilated compartment with logic and other components. One of the two circuit boards also holds a 3-volt lithium button battery, this one is a CR2450, that can be seen through the perforated grill cover. If you access the CEUS settings menu, through the piano keyboard piano icon and control buttons, then bring up time and date you will see this does not remain current unless the CEUS is either left powered on full time (not practical) or the CR2450 battery is periodically replaced. I have been informed by Bösendorfer CEUS technicians that even if this battery has expired, it does not impede proper vital functions of the CEUS.
Because I pamper my Bösendorfer, and have way too much spare time: I removed the four screws holding the vented cover protecting the circuit board panels, accessed the CEUS board then replaced the CR2450 battery. While I was at it, I discarded the mix of three slotted-head and one Phillips head wood screws replacing them all with Phillips head #8 brass wood screws of the same 1-½ inch length; much easier to drive in or remove. The last step was to turn on the CEUS, raise the fallboard, then press the keyboard key lined up to the red LED 'Piano' icon, then navigate to set the date and time. This took only minutes, and I will sleep so much better!
- The CEUS PC Nefarious Power Button: page 20 of the Technical Service Manual v2.00 does mention a 'press the power button of the computer' however, there is no illustration of what this looks like or where it is on my own CEUS PC.
After the first time I had changed the CR2032 battery of my CEUS PC, I replaced the chassis suspended but not fully retracted up into the piano so my monitor cable could access the DVI port; I wanted to give the system one last check prior to disconnecting the DVI. After powering on the main switch, to my dismay the CEUS keyboard display read only "!System startup!" and would proceed no further. I inspected the CEUS PC front panel in the "Nexcom NDiS 161 manual (Oct-2008).pdf" I found later online, and there I noticed a couple of LED lights, one red indicating power, with what appeared to be a tiny button just to the right of the LED's. I pushed the tiny button at right and, to my relief, the CEUS system came on.
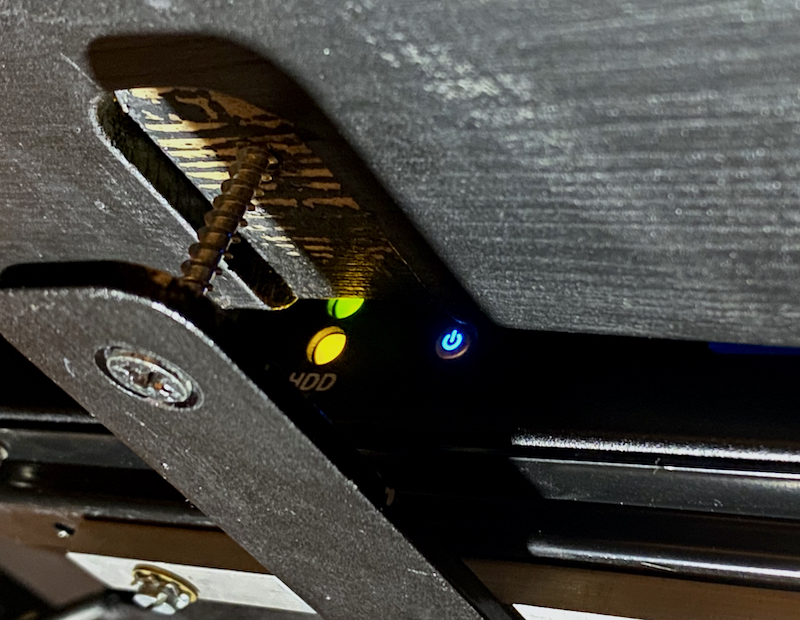
Above: CEUS PC chassis and support frame not yet fully retracted, so video and other ports could be accessed.
The "front panel" (faces the middle of the piano's longitudinal axis) has the blue-illuminated power button. - The CEUS PC Nefarious BIOS Instructions: page 21 of the Technical Service Manual v2.00 does explain how after changing the CR2032 battery the user will have to reset the BIOS of the PC. However, the illustrations of the BIOS menus in the service manual differ from the BIOS of my CEUS.
The factory Technical Service Manual v2.00 directs you to access the BIOS menu, so far, so good. Then "Go to the “Integrated Peripherals” and press „enter“, OK that worked. But then the manual indicates "Go to “Super IO Device” and press ”enter”, I found THERE IS NO “Super IO Device” menu item in my CEUS PC BIOS. I had to put a thinking cap on, then carefully negotiate all the menus without messing up the other proper settings, in order to find the power on after power fail menu choice. I made the proper selection "YES", saved the setting and exited the BIOS menu. After this the CEUS system was fully operational and would properly restart when powered on.
- the DVI-I connector socket is on a side of the CEUS PC chassis with little clearance between the PC and the wood frame of the piano. This makes it difficult to attach most video cable plugs without first loosening the wood screws that hold the chassis in place, and lowering one end of the CEUS PC.
- the DVI-I connector standard has gradually been discontinued so that by 2015 no major manufacturer was making a new PC or display monitor with DVI-I. Fortunately, for the DVI-I standard that CEUS PC employs it is possible to buy a passive adaptive cable or connector that permit use of other monitors including VGA, and HDMI for example.
"after some years I find it is low maintenance, but some..."
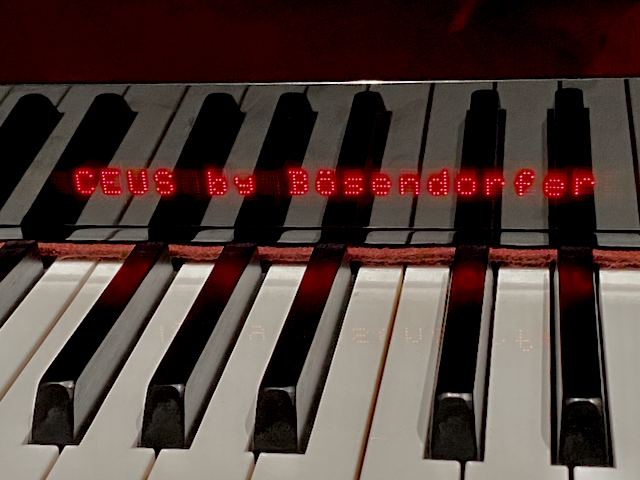 Introduction: the CEUS computerized reproducing piano system requires no special maintenance beyond that you might have for maintaining a personal computer. My piano was returned to Vienna for the CEUS retrofit in 2009, and since then it has been reliable within constraints typical of a personal computer. After a dozen or so years of experience, I have learned quite a bit more about CEUS.
Right: Bosendorfer CEUS system startup message on my Imperial piano. There is a language setting in the menu, here set for English.
Click on image to see enlarged view.
Unfortunately Bösendorfer Klavierfabrik GmbH, since acquired by Yamaha Corp. of Japan, has discontinued development and production of the Bösendorfer CEUS; a critical partner in this no longer was able to help the project. At the time this article was last edited, in October 2023, there are resources for some CEUS tech support remaining at Bösendorfer Klavierfabrik GmbH. So be grateful if you do have a CEUS, and if you do own one then keep it healthy.
The CEUS Computer:
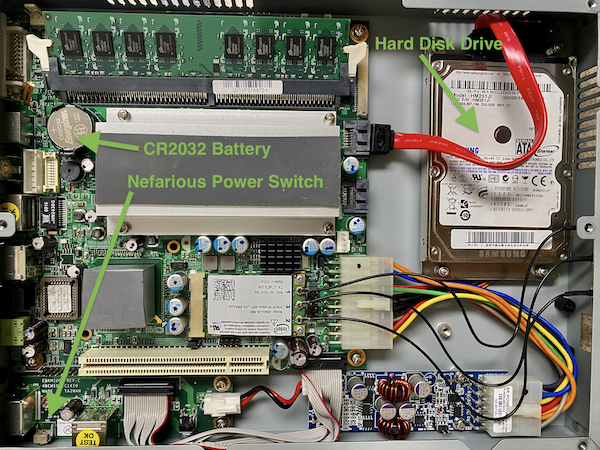
Right: my CEUS PC's interior layout with the components of interest to the user labeled. Mine had a Wi-Fi card retrofitted during a service visit in 2010, so the three black wires extending right are from the card to the chassis-mounted MIMO antenna connectors.
Click on image to see enlarged view.
CEUS PC Hard Disk Drive (HDD), or Solid State Drive (SSD):
CEUS PC Volatile Memory:
-
Both the CEUS motherboard and the main circuit board inside the PC module retain some information in 'volatile memory'. This includes time and date for both, and for the PC networking settings, and other information that are not absolutely necessary to playback functions of CEUS, but can be helpful for recording and some other functions. This memory can be lost when there is no power to maintain it so, most PC computers require a small long-life battery to maintain this information, even when the main computer components are switched to "OFF". In the case of most PC's this is usually a long-life 'button battery', and for the CEUS PC this is a common 3-volt lithium CR2032 "button" battery, as shown in the photo of the CEUS PC interior above at right.
The latest Bösendorfer CEUS Technical Service Manual v2.00 needs a v2.01:
-
The several models of CEUS PC have all kinds of electronic components, sockets, connectors, ins and outs. One can find that even when following the instructions written by Bösendorfer, their particular CEUS may just not come up. This is because, as mentioned above, over the course of production Bösendorfer employed a few different versions of compact PC, and with Windows XP or with Windows 7; the most commonly found (online) "Bösendorfer CEUS Technical Service Manual v2.00" applied to the last production CEUS. Before Bösendorfer tech support explained this to me, I had found this out the hard way in two instances:
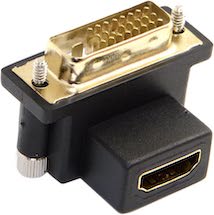 The Digital Visual Interface (DVI) is a 35-pin video display interface, a plug and socket and cable wiring standard, that was developed in the mid 1990's. The several models of CEUS PC made each have a digital DVI video output socket, so an optional external monitor can be connected to facilitate working with the CEUS PC and its loaded software. There had always been at least one problem with this, and by 2023 I found there were two:
So I looked into buying an adapter that would let me solve both problems. I found several possible choices and determined when searching this out one has to pay particular attention to the orientation of the DVI connector. The DVI connector is not a perfect rectangle, but has angled sides that prevent it being connected upside down. Some 90-degree angled plug adapters would have the HDMI connector socket pointing down, as we need it to be. While some other adapter could have the HDMI pointed up and into the piano where it would not be accessible. Fortunately, I was able to find a proper adapter. A nice benefit of this adapter is that it is so compact that I was able to attach it onto the DVI port without first having to lower the CEUS PC from the wood frame of the piano.
A vital aspect of the plug adapter installation is to insure the DVI plug is well seated in the socket. The two knurled fastening jackscrews, #4-40 UNC (as designated with the Unified Thread Standard), must be secured snugly so they do not vibrate or work loose.
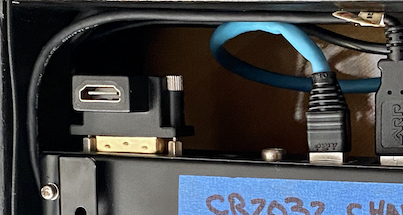
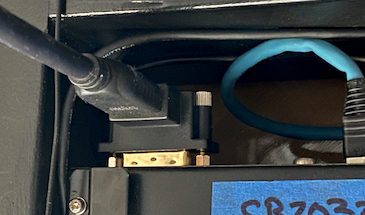
Above: my CEUS PC with the DVI-I plug to HDMI socket 90-degree angled adapter in place.
At right shows an HDMI video monitor cable connector plugged into the DVI-I to HDMI adapter.
-
CAUTION: it can be a costly proposition to have a factory technician visit to repair or replace a fried CEUS, so to reduce the chances of that happening I recommend the employment of surge protection and/or line conditioning equipment. This will connect between any AC Mains power source and the CEUS piano, as well as for any networking cable or other hard wired connection to/from the CEUS equipped piano. Note, the AC electrical panel or power meter of some modern homes already incorporate surge protection and so as long as voltage and cycles are consistent then it might be that no further action is necessary.
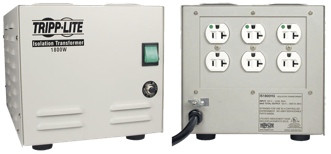 For countries or regions where the quality of the AC power service is variable, or if your area is prone to lightning strikes then one should install an AC Line Conditioner or an Isolation Transformer. This should be connected to a Mains (AC power) outlet, with a tested too insure isolated grounding. These devices can convey electrical AC power to some equipment, or device circuit(s), while isolating the powered device(s) from the AC power source, usually for safety. Isolation transformers protect against electric shock, suppress electrical noise in sensitive devices, or transfer power between two circuits which must not otherwise be connected together.
Right: Tripp-Lite brand Isolation Transformer front and back views.
The Isolation Transformer may be either a stand-alone appliance (shown at right) plugged into an AC main then feeding the device(s) to be protected, or it may be a device wired into the AC mains distribution circuits.
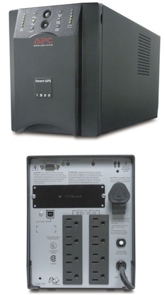
Left: APC brand Uninterruptible Power Supply (UPS), front and back views.
In areas where AC power can drop out then you can employ an Uninterruptible Power Supply (UPS), that provides that there will be no lapse of continuous power to the connected device if the AC Mains/wall current is discontinued. Some UPS's incorporate surge protection and/or line filtering circuitry to protect the attached device from current fluctuations or nearby lightning strike and/or to insure a highly perfected current, free of noise or voltage fluctuations, is delivered to the connected appliance. With loss of Mains power the attached accessories are automatically switched over to run off the rechargeable batteries through a power supply that provides AC power out; this allows the user of the computer to save any edits and perform an orderly shut-down of BOEdit and the computer.
Reliable manufacturers of these devices include APC and Tripp-Lite for example.
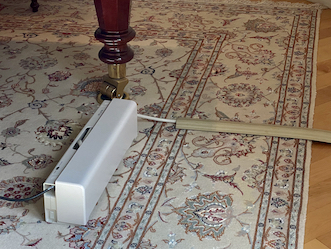 My home has consistently good quality AC mains power. Although unprecedented in my decades here, a power surge from a nearby lighting strike remains a possibility. So, I connect my CEUS to a Surge Suppressor, one that is cosmetically more acceptable than the typically marketed surge suppression distribution power strip.
Right: my Belkin BZ111234-10, made for the USA's 125 volt AC standard, is an 11 outlets 15 Amp capacity, 4260 joule, concealed baseboard Surge Suppressor. Shown to the right of the Surge Suppressor is part of the floor cord cover, this conceals the AC power cord to the wall.
A side benefit of a good Surge Suppressor is it will protect against "line noise". Line noise is caused by electromagnetic interference (EMI) and/or radio frequency interference (RFI), typically generated by operating other equipment on the same electrical system or circuit. This can be transmitted through unprotected AC wiring of a home, and can interfere with audio recording for example.
This is a switched Surge Suppressor that incorporates very subtle LED's that indicate whether protection is on, or if there has been some fault detected. A nice aesthetic feature of this particular model is how the hinged longitudinal cover conceals the protected AC (also cable, and telephone) outlets. Even though I usually need only the one outlet for CEUS, having the extra AC outlets can come in handy when using a monitor or PC for servicing the CEUS. Furthermore, the housing has internal space enough to wrap the AC power cords within, so these do not show as an unsightly mass.
To reduce chances of someone tripping on the AC mains power cord, the cord connected to the wall AC outlet, mine is run through a floor cord cover.